My very good friends Kat and Daisy started their wedding journey over 2 years ago. They were set to get married in April of 2020. As we all know, the world had other plans for that time, and my friends did their best to pivot. They were married in March of that year, but it was a small civil ceremony attended by a handful of guests, including yours truly.
Finally, in September 2022, Kat and Daisy were able to have the big wedding they always dreamed of, and I was lucky to be the MC at their reception! Of course, as MC I needed to catch people's attention. I'd been working on a different dress since 2020, and boy am I glad I put that project aside and decided to make this one instead:
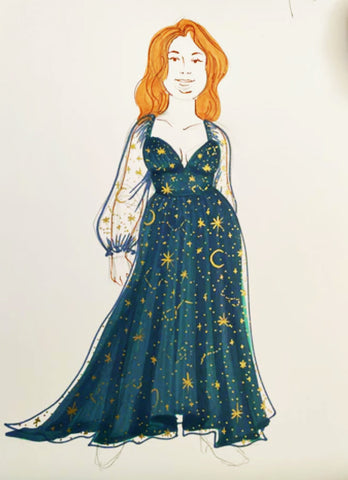
This is my mockup of the design after I had sourced the material. I already had an iridescent dark blue-turquoise material from another friend's wedding (I got to keep the material after I made the bridesmaid dresses). And after long deliberation over colour, meters, and pricing, I found this beautiful starry material from this Etsy seller.

I've seen so many gorgeous dresses with a sheer overlay and poofy sleeves lately, I thought I'd try my hand at it. But there isn't really a pattern that looks specifically like what I had in mind. I tried to create my own pattern, but long story short, after testing it with muslin, it just wasn't working. Making a pattern from scratch was going to take way too much time, and I had about a month to complete this project.
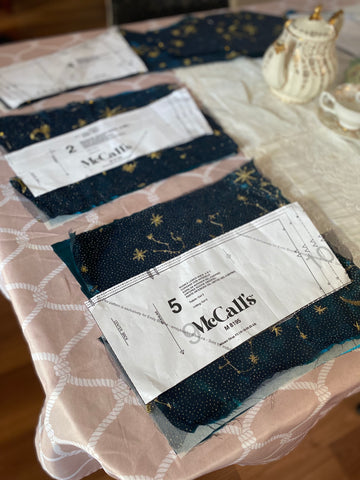
Luckily, I was able to find McCalls pattern M8195, which had a very similar bodice layout. It even included a puff sleeve, but it was absolutely ginormous! So I modified another puff sleeve from a different pattern to make it a bit longer, and also modified the skirt so it was floor length.

Since this pattern didn't include a lace overlay, I elected to baste the lace and satin layers of the bodice pieces together. That way they would work as one. I also added interfacing to the mid-section under the bust, just to give it a bit more shape and that "gown" look without adding in boning (which I find too uncomfortable, especially at weddings where I'm going to be eating and drinking throughout the evening).

The skirt layers were kept loose from each other. The only minor issue with a lace overlay skirt is that I couldn't add pockets to my gown without attaching the layers at the sides. I wanted it to have a flowy look, so no pockets for me unfortunately.
I started with the skirt to ensure I'd like the silhouette. It ended up being a bit more straight than I had imagined, as I wanted it to be more A-line, but it was limited to the amount of fabric I had. Ultimately, I had to redo the skirt because I got mixed up about where the back seam was, and stitched it into the wrong place. Luckily they were easy enough to separate, as I just basted the top of the skirts together and gathered to see what the final skirt may look like.
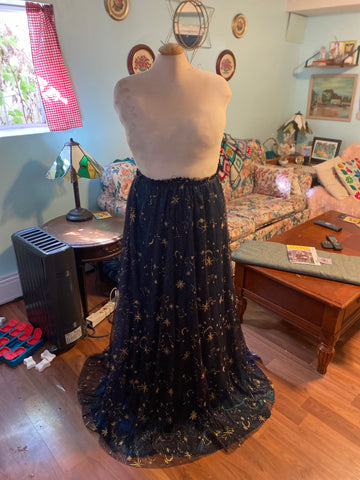

I made the skirt a lot longer than it ended up being. I love how the fabric pools at the bottom here, and if I were going down a red carpet, I definitely would have left it this way. But being an MC requires a more practical hemline - so the skirt was shortened to avoid tripping over it.
With all the modifications in place, the pattern was easy enough to follow. I really love the way the bust is gathered underneath, and how plunging of a neckline it is. I wanted this to show off a lot of chest, because this dress otherwise is pretty full coverage. The pattern actually gave an option of either straps or a gathered puff sleeve at the top. I wanted the sleeve to be set into the straps, so I opted for both!

In this picture I'm pinning the lining to the outer bodice - look at how the little sheer sleeves are dangling off the ironing board 😆
The sheer material itself was really easy to work with. It's a lot stronger than it looks, and the only time it tore is when I needed to pull some seams and accidentally ripped the fabric thinking it was a seam. Over the course of a month I worked on it pretty extensively. I had a specific vision in my mind and wanted to make sure it lived up to that, so this project took me a little longer than most of my sewing.
I knew it was coming along well because my boyfriend would remark on it each time he came over. He'd say, "Oh it's looking really cool!" I asked if he wanted to see me try it on before the day of the wedding and he said he wanted to be surprised, but also wanted to try and match me somehow. I offered to give him the left over material for a pocket square, and he made himself a matching tie!

We look so good together! And it came out exactly how I had imagined. I don't usually tell people I made something I'm wearing, but I did tell the brides I was working on something special for their wedding. I know I did a good job on it because I got a lot of compliments on the day. And of course, any of my friends I didn't tell came up and asked, "Did you make this!?"
The best part was when I told my friends whom I made the bridesmaid dresses for that the underlay was the same material used for their wedding - they seemed to get a kick out of that.
All in all, it was a beautiful wedding. Lots of crying and celebrating and dancing! I'm excited to see what the future brings for my beautiful friends ❤️